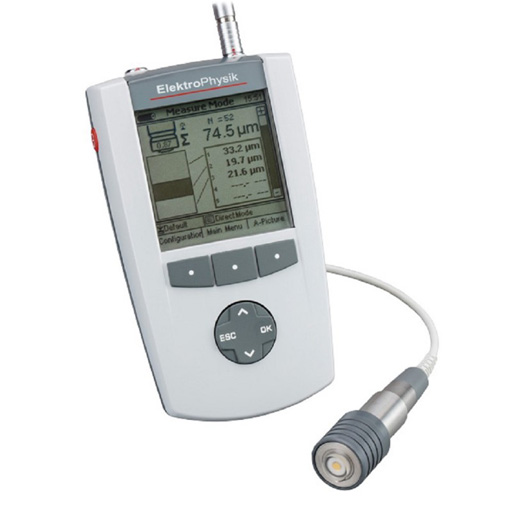
Precision coating thickness gauge based on the ultrasonic pulse run-time method.
The QuintSonic 7 enables measurement of up to 5 coatings in a single operation.
It is possible also to measure polymer coatings like paints, varnishes and synthetic materials as well as glass, ceramic or metallic coatings on virtually any substrate. Varnish on synthetic materials, copper on ceramic, synthetic materials on wood, or glass on metal form the typical coating systems that can be measured by the QuintSonic 7.
As the first equipment of its sort, the QuintSonic 7 makes it possible to measure coatings on fibre-reinforced plastics, e.g. GFRP, CFRP, WPC.
The intelligent evaluation of the ultrasonic signal reading allows rapid recording of measured values of over 40 measurements per minute.
Simple calibration and graphic display of the test results on the A screen of QuintSonic 7 enables quick operability and versatile use.
Application
Non-destructive measurement of:
- Varnish, synthetic materials, glass, enamel and other coatings on wood, synthetic materials, glass, metal and ceramic
- Metal coatings on synthetic materials, ceramic and wood
- Up to 5 coatings in a single operation.
Also suited for wall thickness measurement.
Performance features
- Quick evaluation of the measuring signal, high accuracy and repeatability owing to the sensor-integrated digital 32-bit signal processing (SIDSP®)
- Over 40 measuring values per minute: start, wait for 1 second, done.
- Mere 5 mm measuring area enables gathering measurement on tiny and curved parts
- Graphic display showing individual coatings, zoom-enabled A screen and menu-driven user guidance
Scope of delivery
- QuintSonic 7 basic unit
- Ultrasonic sensor with 1 m / 40" sensor cable
- USB-Adapter cable
- Software QSoft 7 Basic Edition on CD
- Operating manual German / English on CD
- 1 bottle glycerine couplant, 100 ml
- 1 bottle coupling gel by ElektroPhysik, 100 ml
- 4 batteries AA / LR06
- Plastic carrying case
| Property | Value | ||||||||||||||||||||||||
|---|---|---|---|---|---|---|---|---|---|---|---|---|---|---|---|---|---|---|---|---|---|---|---|---|---|
| Measuring principle | Ultrasonic pulse run-time method | ||||||||||||||||||||||||
| Measuring range / Resolution / Accuracy |
| ||||||||||||||||||||||||
| Minimum layer thickness | approx. 10 µm (depending on the ultrasonic velocity in the layer) | ||||||||||||||||||||||||
| Number of layers | up to 5 layers in one operation | ||||||||||||||||||||||||
| Measurement cycle time | approx. 1 s | ||||||||||||||||||||||||
| Measuring area | 5 mm Ø / 0.2" Ø | ||||||||||||||||||||||||
| Contact area | 10 mm Ø / 0.4" Ø | ||||||||||||||||||||||||
| Minimum curvature radius |
| ||||||||||||||||||||||||
| No. of test series | 300 | ||||||||||||||||||||||||
| Measurement storage | 250,000 | ||||||||||||||||||||||||
| Measurement units | µm, mm, mils | ||||||||||||||||||||||||
| Calibration | Sound velocity calibration for up to 5 layers | ||||||||||||||||||||||||
| Statistics | N (number of measurment values) Minimum Maximum Average Standard deviation Coefficient of variation Block statistics (user adjustable) Histogram Trend diagram | ||||||||||||||||||||||||
| Interface | Infrared (IrDA® 1.0) USB optional RS-232 via additional adapter cable | ||||||||||||||||||||||||
| International Standards | DIN EN ISO 2808 | ||||||||||||||||||||||||
| Signal processing | Sensor integrated digital 32-bit signal processing (SIDSP®) | ||||||||||||||||||||||||
| Operating temperature | 5 °C - 50 °C / 40 ° F - 122 °F | ||||||||||||||||||||||||
| Storage temperature | -10 °C - 50 °C / 14 °F - 122 °F | ||||||||||||||||||||||||
| Power Supply | 4 x Mignon battery AA / LR06 Power supply (90 - 240V AC / 48 - 62 Hz) | ||||||||||||||||||||||||
| Dimensions |
| ||||||||||||||||||||||||
| Weight |
|


Do you have a question?
min 10 ch