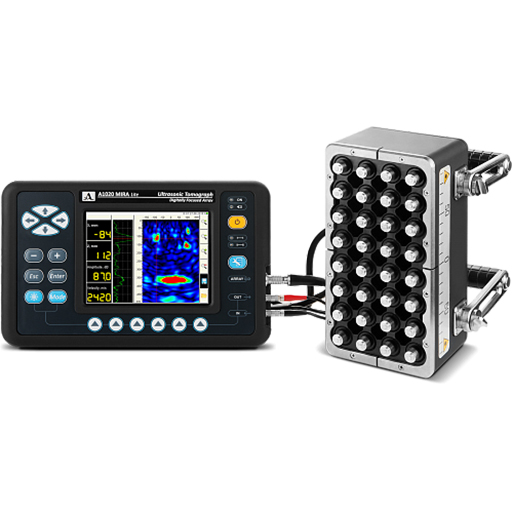
A1020 MIRA-lite is a low-frequency ultrasonic tomography system for manual ultrasonic testing, 2D and 3D visualization, and quality evaluation of concrete and reinforced concrete structures
The instrument is a hand-held lightweight low-frequency ultrasonic device of general purpose. It is a fully autonomous system used for the acquisition, topographic process, and evaluation of pulse-echo ultrasonic data. The sensor system contains a matrix antenna of 32 (8 blocks with 4 elements in each) low-frequency broadband transverse wave dry point contact (DPC) transducers with ceramic wear-resistant tips for long-term couplant-free operation on rough surfaces.
The A1020 MIRA-lite is dedicated for non-destructive testing constructions made of concrete, reinforced concrete and stone with one-sided access. It allows estimation of material integrity by detection of local inclusions, cavities, voids, delaminations, not grouted areas and cracks as well as object thickness measure. Typical application fields of the system are reinforced-concrete buildings, facilities, bridges, tunnels, highways, airdromes in construction and in operation / maintenance. Further the instrument can be used in the mining industry to evaluate the quality of the exploitable minerals.
The A1020 MIRA-lite allows quick and efficient testing of the large objects with its three-dimensional visualization and documentation of the inspection results by means of provided software INTROVIEW-CONCRETE by ACS (in delivery volume).
APPLICATION
- Inspection of concrete constructions up to 1200 mm thickness for the purpose of evaluating of the consistency of the construction.
- Search for foreign inclusions, cavities, voids, delaminations, leaks of filling and cracks in the concrete objects, reinforced concrete objects and natural stone.
- Search for plastic and metal pipes of a diameter more than 10 mm in reinforced concrete.
- Evaluation of the condition of the channels with stressed reinforcement in reinforced concrete bridges.
- Inspection of understructures, columns, and overhead covers in cast-in-place constructions to detect voids and leaks of filling.
- Search for voids and cavities back of liner plates of underground and railway tunnels.
- Inspection of refractory blocks of the glass blowing furnace.
- Estimation of the thickness of the concrete cover and depth of coverage reinforcement.
- Thickness measurement of the testing object at one-sided access.
- Detailed registration of the results obtained.
| Sensor system | Built-in matrix antenna array |
|---|---|
| Number of transducers in the antenna array | 32 |
| Type of the transducers used in the antenna array | Low-frequency broadband transversal Dry Point Contact transducers with ceramic wear proof tips |
| Nominal transducer frequency | 50 kHz |
| Analog band width | 10 to 100 kHz |
| Maximum penetration depth in concrete | up to 1 000 mm |
| Maximum penetration depth in reinforcement concrete | up to 400 mm |
| Period of continuous operation of the instrument powered from the accumulator, no less than | 8 hours |
| Average service life, no less than | 5 years |
| Operating temperature | -10 to + 50 °C |
| Transducer array dimensions | 220 x 110 x 90 mm |
| Electronic block dimensions | 260 X 165 X 85 mm |
| Screen dimensions | 5,7’’ |
| Real-time visualization: | Up to 8 Hz |
| Number of A-Scans in thomography synthese | 64 |
| Visualization modes on board: Visualization modes by INTROVIEW: | A-Scan, cross-sectional B-Scan |
| Data interface | USB 2.0 |


Do you have a question?
min 10 ch