Also called grind gages and Hegman gages.
Many types of solid materials must be ground or milled into finer particles for dispersion in appropriate liquid vehicles. The physical properties of the resulting dispersions, often called "grinds", depend not only on the actual size of the individual particles, but also on the degree to which they are dispersed.
The Fineness of Grind Gage is used to indicate the fineness of grind or the presence of coarse particles or agglomerates in a dispersion. It does not determine particle size or particle size distribution.
Grind gages are used in controlling the production, storage, and application of dispersion products produced by milling in the paint, plastic, pigment, printing ink, paper, ceramic, pharmaceutical, food, and many other industries.
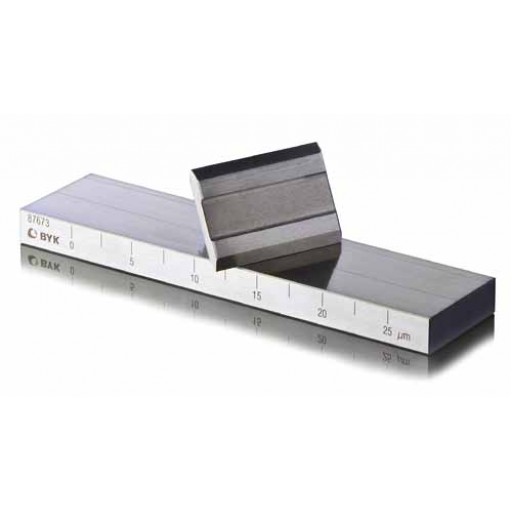
The Fineness of Grind Gage is a flat steel block in the surface of which are two flat-bottomed grooves varying uniformly in depth from a maximum at one end of the block to zero near the other end. Groove depth is graduated on the block according to one or more scales used for measuring particle size.
Most gages will have one scale marked in either mils or microns.
- 1 mil = 25.4 microns
- 1 mil = 0.001 inch
- 1 micron, μm = 0.001 mm or 10-6 m
The Hegman scale or National Standard scale may be abbreviated "NS" on the gage. The scale ranges from 0 to 8 with numbers increasing as the particle size decreases.
- 0 Hegman = 4 mil/100 micron particle size
- 4 Hegman = 2 mil/50 micron particle size
- 8 Hegman = 0 mil/0 micron particle size
BYK-Gardner offers a wide variety of grind gages varying in scales, number of grooves, length and width of grooves and size of the block. Comes in a reusable storage box to prevent damage.
| Standards | |
| ASTM | D 333, D 1210, D 1316 |
| ISO | 1524 |
| FTMS | 141a, Method 4411.1 |
| Procedure |
| Place a slight excess of sample in the deep end of the groove, and with the straight-edge scraper provided, draw the sample toward the shallow end of the groove. Ratings are in terms of the point on the scale where the oversize particles, or furrows made by them, first appear in substantial concentration. |
| Ordering Informations | |
| Cat. No. | Description |
| PD-1518 | Replacement Scraper, SS |
| Accessories | |
| Net Weight | Shipping Weight |
| 0.12 kg (0.26 lbs) | 0.45 kg (1 lbs) |
| Ordering Informations | Technical Specifications | ||||||
| Cat. No. | Description | Path Size | No. of Paths | Scales | Range | Dimensions | Net Weight |
| PD-1509 | Grindometer 15* | 13 x 130 mm | 2 | Micron/ Hegman | 0 - 15 8 - 6.8 | 169 x 42 x 13 mm | 1 kg (2.2 lbs) |
| PD-1510 | Grindometer 25* | 13 x 130 mm | 2 | Micron/ Hegman | 0 - 25 8 - 6 | 169 x 42 x 13 mm | 1 kg (2.2 lbs) |
PD-1511 | Grindometer 50* | 13 x 130 mm | 2 | Micron/ Hegman | 0 - 50 8 - 4 | 169 x 42 x 13 mm | 1 kg (2.2 lbs) |
| PD-1512 | Grindometer 100* | 13 x 130 mm | 2 | Micron/ Hegman | 0 - 100 8 - 0 | 169 x 42 x 13 mm | 1 kg (2.2 lbs) |
| PD-2500 | Gage No. 25 | 0.5 x 2 in | 2 | Hegman/ Mils | 8 - 0 0 - 5 | 0.5 x 2.5 x 4.75 in | 0.9 kg (2.0 lbs) |
| PD-2501 | Gage No. 45 | 0.5 x 4 in | 2 | Hegman/ Mils | 8 - 0 0 - 5 | 0.5 x 2.5 x 6.75 in | 1.6 kg (3.5 lbs) |
| PD-2502 | Gage No. 65 | 0.5 x 6 in | 2 | Hegman/ Mils | 8 - 0 0 - 5 | 0.75 x 2.5 x 8 in | 1.8 kg (4.0 lbs) |
| PD-2503 | Gage No. 5251 | 0.5 x 5 in | 2 | Microns/ Mils/ Hegman | 0 - 25 0 - 1 8 - 6 | 0.5 x 2.5 x 6.75 in | 1.8 kg (4.0 lbs) |
| PD-2504 | Gage No. 5252 | 0.5 x 5 in | 2 | Microns/ Mils/ Hegman | 0 - 50 0 - 2 8 - 4 | 0.5 x 2.5 x 6.75 in | 1.8 kg (4.0 lbs) |
| PD-2505 | Gage No. 5254 | 0.5 x 5 in | 2 | Microns/ Mils/ Hegman | 0 - 100 0 - 4 8 - 0 | 0.5 x 2.5 x 6.75 in | 1.8 kg (4.0 lbs) |
| PD-2506 | Gage No. 54 | 2 x 5 in | 1 | Hegman/ Microns | 8 - 0 0 - 100 | 0.75 x 3.5 x 7.5 in | 3.6 kg (8.0 lbs) |
| PD-2507 | Gage No. 52 | 2 x 5 in | 1 | Hegman/ Microns | 8 - 4 0 - 50 | 0.75 x 3.5 x 7.5 in | 3.6 kg (8.0 lbs) |
| PD-2508 | Gage No. 51 | 2 x 5 in | 1 | Hegman/ Microns | 8 - 6 0 - 25 | 0.75 x 3.5 x 7.5 in | 3.6 kg (8.0 lbs) |
| PD-2509 | Gage No. 6251 - G1 | 1 x 6.25 in | 2 | Hegman/ Micron/ NPIRI | 8 - 6 0 - 25 0 - 10 | 1 x 3.5 x 9.5 in | 5.0 kg (11 lbs) |
| PD-2510 | Gage No. 6252 - G2 | 1 x 6.25 in | 2 | Hegman/ Microns/ NPIRI | 8 - 4 0 - 50 0 - 20 | 1 x 3.5 x 9.5 in | 5.0 kg (11 lbs) |
| PD-2511 | Gage No. 6254 - G3 | 1 x 6.25 in | 2 | Hegman/ Microns/ NPIRI | 8 - 0 0 - 100 0 - 30 | 1 x 3.5 x 9.5 in | 5.0 kg (11 lbs) |
| PD-2512 | Gage No. PD-250 | 1 x 6.25 in | 2 | Microns/ Microns | 0 - 50 0 - 250 | 1 x 3.5 x 9.5 in | 5.0 kg (11 lbs) |
| PD-2513 | Gage No. PB-20 | 0.5 x 8 in | 2 | Mils | 0 - 20 | 1 x 2.5 x 9.5 in | 3.0 kg (6.5 lbs) |
| PD-2515 | Gage No. SI 1 | 0.5 x 6 in | 2 | Microns/ NPIRI | 0 - 25 0 - 10 | 1 x 1.5 x 8 in | 1.6 kg (3.5 lbs) |
| Comes complete with: | |||||||
| |||||||
| * Designed to comply with ISO method 1524 | |||||||


Do you have a question?
min 10 ch