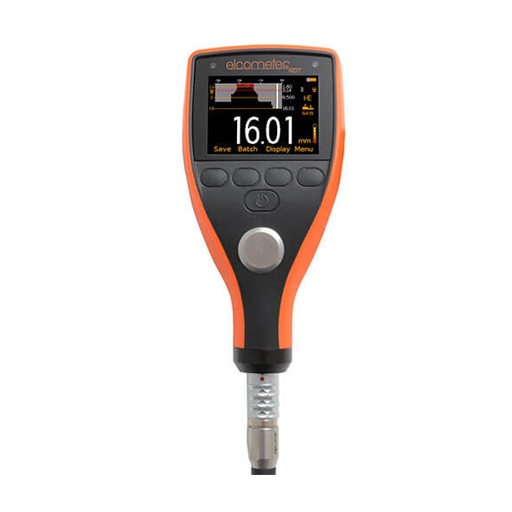
Elcometer Ultrasonic Precision Thickness Gauge
The Elcometer PTG Precision Thickness Gauge range comes with all the features and functionality necessary for precisely measuring material thickness on virtually any material.
Features
- Interface Echo (I-E) Echo-Echo (E-E) ) & Plastic Mode (PLAS) measurement modes
- Measurement range from 0.15mm (0.006") to 25.40mm (1.00")
- 2-Point, 1-Point, Material & Factory Calibration options
- Three user programmable calibration memories
- User selectable measurement rate; 4,8,16 readings per second
- User selectable reading resolution; 0.1mm (0.01") or 0.01mm (0.001")
- Scan Mode
- Readings, selected statistics, Bar Graph, Run Chart, B-Scan & Differential Mode
- Gauge memory; stores upto 100,000 readings in up to 1,000 sequential or grid batches
- User definable upper and lower limits with audible & visual pass/fail warnings
- USB and Bluetooth® data output to ElcoMaster® and ElcoMaster® Mobile Apps
Accurate
Measures thin materials with pinpoint accuracy.
Flexible & easy to use, the Elcometer PTG gauges have a measurement range from 0.15mm (0.006”) to 25.40mm (1.000”) with up to ±1% accuracy, across three measurement modes; Interface Echo (IE),Echo Echo (EE) & Plastic mode (PLAS).
Powerful
Store each measurement for further analysis.
Up to 100,000 readings can be saved into the gauge memory as each measurement is taken, which can be downloaded later into an inspection application or into ElcoMaster® for further analysis and reporting.
Wireless Connectivity
Seamlessly connect to any PC, Android™ or iOS mobile device.
Connect the Elcometer PTG8 via Bluetooth® or USB to a PC, Android™ or iOS mobile device & download the data into an inspection application or into ElcoMaster® Software for instant report generation.
Customisable
Choose & customise the reading display.
The Elcometer PTG range has a choice of display modes allowing the user to select the most appropriate for their needs; Readings, Selected Statistics, Bar Graph, Run Chart & Differential Mode.
Measurement Modes
Interface Echo (IE); The total thickness from the top of any coating through to the material density boundary (typically the back-wall) is measured. Suitable for measurement of materials between 1.65mm and 25.4mm (0.065” to 1”) thick.
Echo Echo (EE); ideal for measuring thin materials, the material thickness from the top surface of the material to the material density boundary (typically the backwall) is measured. Suitable for measurement of materials between 0.15mm and 10.15mm (0.006” to 0.4”) thick.
Plastic Mode (PLAS); specifically used for measuring very thin plastics between 0.15mm and 5mm (0.006” to 0.197”) thick. A graphite delay line is required when using this mode.
User Definable Upper and Lower Limits
The PTG gauges have user definable upper and lower limits with audible and visual pass/fail warnings allowing the user to compare readings to predefined values. The PTG8 can store up to 40 pre-programmed limits which can be set for individual readings or for each batch.
If a measurement is taken which falls outside set limits, the reading value and the limit icon turn red, the red LED flashes and the alarm beeps providing immediate indication of problem areas.
Calibration Options
The PTG gauges have a number of calibration options including the 1-Point & 2-Point method and Velocity. Alternatively, the user can select one of 39 pre-set materials stored within the gauge including; aluminium, steel, stainless steel, cast iron, plexiglass, PVC, polystyrene and polyurethane.
The PTG8 allows users to store into memory up to three calibrations. Once saved the user can select a calibration without the need to re-calibrate the gauge. Using the gauge’s alpha-numeric function, calibration memories can be re-named to suit the calibration setting.
| Model Number | PTG6 | PTG8 | ||||||
| Part Number (with transducer)1 | PTG6DL-TXC | PTG8BDL-TXC | ||||||
| Part Number (gauge only) | PTG6 | PTG8BDL | ||||||
| Limits:40 definable audible & visual pass/fail warnings | ■ | |||||||
| Measurement Rate | 4, 8, 16Hz2 | 4, 8, 16Hz2 | ||||||
| Measurement Mode | Range3 | Accuracy4 | ||||||
| Echo Echo (EE) | 0.15-10.15mm (0.006-0.400”) | ±0.015mm
(0.15-2.99mm) ±0.5% (3.00-10.15mm) | ±0.0006”
(0.006-0.117”) ±0.5% (0.118-0.400”) | ■ | ■ | |||
| Interface Echo (IE) | 1.65-25.40mm (0.065-1.000”) | ±0.015mm
(1.65-2.99mm) ±0.5%(3.00-25.4mm) | ±0.0006”
(0.065-0.117”) ±0.5% (0.118-1.000”) | ■ | ■ | |||
| Plastic Mode (PLAS) | 0.15-5.00mm (0.006-0.197”) | ±0.015mm
(0.15-2.99mm) ±0.5% (3.00-5.00mm) | ±0.0006”
(0.006-0.117”) ±0.5% (0.118-0.197”) | ■ | ■ | |||
| Measurement Units | ||||||||
| mm or inches | ■ | ■ | ||||||
| Repeatability / Stability Indicator | ■ | ■ | ||||||
| Display Mode | ||||||||
| Reading | ■ | ■ | ||||||
| Selected statistics | ■ | |||||||
| Scan thickness bar graph | ■ | |||||||
| Run Chart | ■ | |||||||
| Readings and Differential | ■ | |||||||
| B-Scan cross sectional display | ■ | |||||||
| Selectable Reading Resolution | ||||||||
| Lo; 0.1mm, 0.01 Inch, 10m/s, or 0.001 in/μs | ■ | ■ | ||||||
| Hi; 0.01mm, 0.001 Inch, 1m/s, or 0.0001 in/μs | ■ | ■ | ||||||
| Statistics | ||||||||
| Number of readings,n; Mean average, x¯ ; Standard deviation, σ. | ■ | |||||||
| Lowest reading, Lo; Highest reading, Hi | ■ | |||||||
| Low / high limit value | ■ | |||||||
| Reading Range Value | ■ | |||||||
| Nominal Value | ■ | |||||||
| Number of readings below low limit | ■ | |||||||
| Number of readings above high limit | ■ | |||||||
| Calibration Options | ||||||||
| 1 - point | ■ | ■ | ||||||
| 2 - point | ■ | ■ | ||||||
| Material selection; 39 preset materials | ■ | ■ | ||||||
| Factory; resets to the factory calibration | ■ | ■ | ||||||
| Velocity (speed of sound) | ■ | ■ | ||||||
| Calibration Features | ||||||||
| Calibration lock; with optional PIN Lock | ■ | ■ | ||||||
| Test calibration feature | ■ | ■ | ||||||
| Calibration memories: 3 programmable memories | ■ | |||||||
| Measurement outside calibration warning | ■ | |||||||
| Data Logging | ||||||||
| Number of readings | 100,000 | |||||||
| Number of batches | 1,000 | |||||||
| Sequential batching | ■ | |||||||
| Grid batching | ■ | |||||||
| Fixed batch size mode; with batch linking | ■ | |||||||
| Obstruct entry; add 'obst' into grid location | ■ | |||||||
| Delete last reading | ■ | |||||||
| Date & time stamp | ■ | |||||||
| Review, clear & delete batches | ■ | |||||||
| Alpha numeric batch names; user definable | ■ | |||||||
| Batch review graph | ■ | |||||||
| Data Output | ||||||||
| USB to PC | ■ | ■ | ||||||
| Bluetooth® to PC, Android™ & iOS devices | ■ | |||||||
| ElcoMaster® software | ■ | ■ | ||||||
| Transducer Probe Type | ||||||||
| Single Element | ■ | ■ | ||||||
| Auto transducer recognition | ■ | ■ | ||||||
| Battery Type6 | 2 x AA | 2 x AA | ||||||
| Battery Life6Alkaline : 15 hours Lithium : 28 hours | ■ | ■ | ||||||
| Operating Temperature -10 to 50°C (14 to 122°F) | ■ | ■ | ||||||
| Size (w x h x d) 145 x 73 x 37mm (5.7 x 2.84 x 1.46") | ■ | ■ | ||||||
| Gauge weight (including batteries) | 210g (7.4oz) | 210g (7.4oz) | ||||||
1PTG supplied with 15MHz 1/4" Microdot right angle single element transducer
2User selectable default setting in scan mode is 16Hz
3Dependent on the material being measured and the transducer being used
4On steel
5Supplied with Alkaline, Lithium and rechargeable can be used with the gauges, continuous use at 1 reading per second


Do you have a question?
min 10 ch